Thursday 27 October 2016

lighting up the sky !

Pin It now!

Wishing everybody a very happy diwali 
& a prosperous new year

The brown text below are active links to images, etc. Click on them....

This wasn’t how I had intended to post. I was hoping to tat a few more diyas besides this prototype and share the pattern alongside. Haven’t been able to keep my focus on anything, including tatting, and before time slips away to a lengthy year-long wait, I decided to do a bit of MS Paint jugglery and post as is.


To me, the main attraction, the charm of Diwali or Deepavali ("festival of lights") is the diya (clay lamp) with it’s mesmerizing flame, and the rangoli. My favorite motif for Diwali greeting cards was always the diya. 
Used to spend hours making colourful dry powder rangoli, using freehand designs that I came up with each year. Once sis & I even did a Krishn & Radha theme. 
Many communities use ground rice flour paste – all white or with a touch of colour added to the design.

I’ve tried to imitate the wet kolam in this collaged pic. 
The white tatting is part of a new snowflake I have designed (still trying to get the stitchcount, etc. right) to share later.

This diya doodle prototype is pretty tiny – 1”x1¼” and uses 2 thread sizes.
The mistakes are glaringly visible in the pic :-( 
I had ideas to make it simpler to tat, but have only been able to do the diya again, before shelving all my tatting, etc. for  a while.

A string of diyas is also called a deepmala - garland of lights! 
Can you see a larger diya symbolism in this arrangement?

The mustard oil or ghee used in the diyas actually served to keep away mosquitoes and purify the air. There are tons of environmental, seasonal, social, &/or health reasons for the traditions enshrined in festivals. Over time, they either become dogmatic, or simply blind, meaningless gestures. Other influences take over, as well. For instance, it is so much easier, cheaper, durable and practical to use strings of fairy lights than the cumbersomeness of diyas, especially on a windy night !

I love the brilliant fireworks that light up the sky, too. 
(now, if only they make those ghastly sounds & pollute the air!). 
Yes, that's my Crinoline Doily glowing around ;-)

I hope to share the Craftree butterfly pattern in next post.

happy tatting always :-)

Saturday 22 October 2016

fluorescent candy

Pin It now!

For all sweet-tooth tatters, my serving of a neon-isc candy treat. Hope you enjoy the slow release of flavors ;-p

Hamigyeong (tattingweed)

Most of the details have already been accounted for in the previous post, including graphics of how the work progresses, a few tips, and my working notes. Keeping my promise of few words ....
Love the multiple patterns and shapes that jump out ….

This is the same pic, with swirling wheel effect, as the lead in previous post, against a black background.

Finished size – 7½”. From clover point to point - 7¾” ALL IN ONE PASS !!!
Threads - Anchor crochet cotton size 50 black; Anchor Embroidery 4615 – 1335 2 strands.

Techniques I used : 2 shuttle tatting, directional tatting, reverse stitch, split rings, self-closing mock rings, thrown/floating rings, folded chain, reverse join, up & down picot joins, split ring join.
Personalized colour placement required some additional callisthenic  

If the graphics in my previous post scared anybody, Hamigyeong shares a simpler and smaller Little Butterflycoaster/doily with the pattern inked here. It is like a precursor to the larger and more complex Crinoline, both conforming to the same basic principles.
I don’t particularly like too much open space in a doily, preferring them a bit dense. And if the chains were shorter in this one, it might have been that much simpler to work with. But I enjoyed Every Single Moment of it. And I absolutely love the clean lines without picots ! 
How simple rings and chains can be meshed together ! Brilliant designing !!! Of course, one needs one’s wits around while working this. It is not your everyday relax-and-tat pattern, thus making it so much more special. It does, however, follow a logical sequence and stitch-count which becomes easier at the 3rd quadrant stage (for me).
I hadn’t realized that Hamigyeong (aka tattingweed) is the author of the currently popular book “Tatting Lace With Your Life” ! Check out her beautiful work on Instagram . She also goes by the name of  Fireweed Plains. This is her gorgeous working of the Crinoline doily that got me ‘shuttled’ immediately. (I didn’t have this link earlier). Of course the timing was just right - it has helped me further in my TWoT series.

 Many many thanks to Hamigyeong for sharing her brilliant design !

happy tatting :-)


Thursday 20 October 2016

truly serpentine

Pin It now!
I had written this post some days back, while still less than halfway through the doily. Didn’t get a chance to either take pics or to notate 
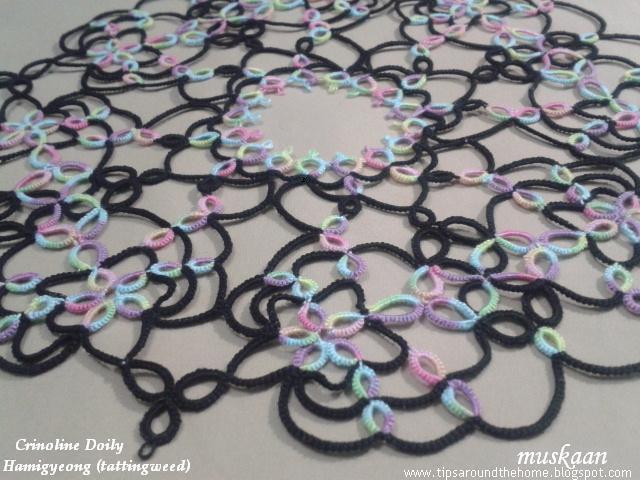
them and post. Meanwhile, I completed tatting the entire doily a couple of days back. Life is a bit in the way, and that has forced me to break the presentation into 2 posts. Here, I will share my working notes (the Boring stew), giving me time to complete the presentation of the finished doily (the yummy candy).

My Working Notes
for
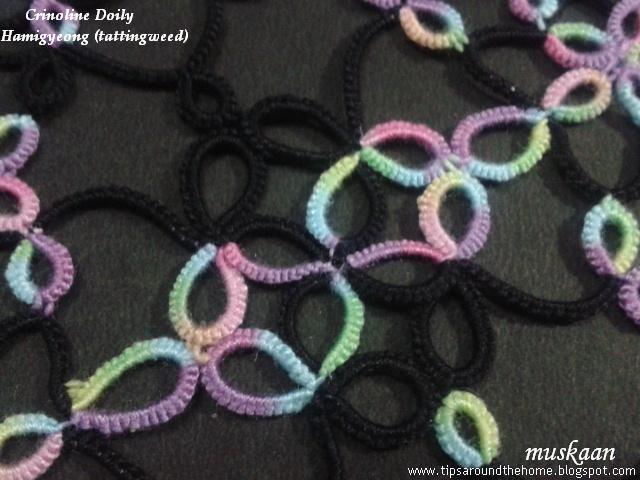
There is quite a bit of interest in this beautiful doily. Before I start to forget, I’d like to share my working and thoughts ….The doily is not blocked, so please excuse the pics

Abbreviations used (in order of appearance):
SCMR – self closing mock ring
DS – double stitch
RODS – reverse order DS
SLT – shoe lace trick/overhand tie
p – picot
shs – 2nd half stitch
fhs – 1st half stitch
RS – reverse stitch (unflipped)
RW – reverse work

1. Worked completely in one pass !!! Divided into 4 quadrants ; each further divided into 2 mirrored halves (thus we get 8 sectors or pizza slices). Each quadrant (made of 2 sectors) forms one complete repeat.

At this stage it looks like a bull’s head !!!!
2. When considered for the doily as a whole, the overall direction of work is counterclockwise. However, within each sector, we work in many different directions, including ‘up and down’, ‘in and out’. It’s serpentine movement reminds me of the magic square and Iris Niebach’s doilies. 


3. The pattern as such is simple, worked with two shuttles : Rings and chains with reverse work. 4 SCMRs, few split rings, and a few rings made with 2nd shuttle. That’s about it! What makes this doily an arguably advanced or skilled pattern is the movement of the elements and segments – not easy to memorize.

4. If one is doing directional (frontside/backside) tatting, then we encounter ‘blocks’ or segments that act as a “unit” – thus we start with a segment where rings are DS & chains are RODS; then switch to the next segment where rings are RODS and chains DS. Those who have tatted Mary Konior’s Spinning Wheel Glass Mat in directional tatting (or in 2 colours) will understand how one half of the wheel ‘spoke’ works as a unit/block/segment.

5. Exception to #4 : There are also what I consider ‘thrown’ rings (even though they may not strictly be on a chain) ie. rings made with the other/auxiliary/second shuttle. They, of course, will follow the order of the ‘chain’ (RODS or DS)
6. I did add some complexity of my own (yes, I can’t seem to leave well enough alone !) by customizing the placement of colour using Reverse Join or simply laying one thread over the other (instead of SLT. See, I’m not much of a stickler for rules, nor a lover of SLT ;-) ).

7. To turn direction, I used ‘folded chains’ ie., (p, 2shs) or (p, 2fhs). These were included in the stitchcount of the chain (1DS). The folded chain also helps to keep the colour of chain constant.

TIP : In order to fold the chain, I made a picot and continued with the Same half stitch twice, as the last half stitch ; thus there are 3 same half-stitches in a row.
Note that in directional tatting the order switches after folding, because the chain has turned back over itself!
Thus, when folding a DS chain : (p,2shs) , continue next chain with RODS
Conversely, when folding a RODS chain : (p,2fhs) , continue with DS

8. I love the way tattingweed has sketched & notated over the scanned doily with little red arrows showing the direction of tatting – very clear. While tatting, though, I did miss the numbering on rings. Hence, halfway through the 3rd sector, I took another printout & inked the ring sequence. It really helped ! I also added the stitch count for the mirrored Sector 2. in the first printout.

9. There are some rings that need picots, while other elements join there. Due to changes in direction, it was sometimes difficult to tell which ring came first and had the picot. I made a black line on that ring, in the printout. But with the rings numbered in 2nd printout, it was easy.

10. Using Reverse Stitch for chains is another way to keep track of the pattern. RS helps us tat from the front, reducing RW to a minimum. This makes it easier to read the printed sketch. However, if a segment has many ‘thrown’ rings, then RS is not such a convenient option (unless one uses Reverse Rings or Rings in RS!)
As it turned out, I didn’t use the RS much for various reasons. It did come to the rescue in the very last segment, when joining back to the first sector. Here, one has to work inwards, and it became too confusing. When I switched to RS, I could accomplish the tatting and joining all from the front.


Spot treatment

There were a few mistakes where I had to retro-tat the element. But one mistake was discovered very late and a lot of tatting would have to be cut – I had joined a ring to the wrong picot! This called for some minimally invasive localized surgery.
Here’s what I did :
Cleared some space in the ring by moving the stitches and snipped the stitch thread - Not the core thread ; Not the entire ring.
Logic : It would give me plenty of thread at either end when the ring was unraveled.  Luckily it was a large ring and I had more than enough length to sew in the ends to adjoining elements.
Pull the core thread to unravel all the stitches.

Add new thread and tat the ring.
This was also completely knotless method of hiding ends – tatting over tails and sewing in opposite directions to adjoining elements
As I write this, I realize an easier way – I could’ve done a Mock Ring using the core of snipped ring! Waaaaah :-(  Or may be I had already closed the ring and it didn’t seem worth the trouble to unravel it. Memory evades; but nevertheless a solution to keep in mind for future.

As a reward to those who have diligently read through all this, I’ll keep my mouth shut for the most part of the grand reveal in next post, letting pics do the talking. Ummm, at least I’ll try my best ;-p

happy tatting till then :-)

Saturday 15 October 2016

A goodie bag of free patterns

Pin It now!
at least I hope you think they are goodies, and not ho-hums. 
and plenty more patterns to come, so keep your bag open in the coming weeks for snowflakes, squares, triangles, flowers, ....
There is also a notification at end of post ...

«»«»«»«»«»«»«»«»«»«»«»«»«»«»«»«»«»

I was thrilled when Georgia asked if I would share my Bonds of Love Rakhi/Bracelet pattern for this year’s Palmetto Tat Days goodie bag. Preferably with beads. Hmmm, working with beads – a challenge but also an opportunity.  

Staring at my plain rakhi, one thing was for sure – I wanted beads inside the 2 hearts, following the curve of the long chains and filling in the space. Ninetta uses beads so beautifully, and she sent me loads of Gorgeous beaded tatting – various ways in which beads could be incorporated – pics of her own works and other resource links. She was just as excited as me and test-tatted a sampler that very night while I slept! Thanks, cara amico :-)
In the end, though, I kept it as simple as possible, adapting the rakhi to a beaded bracelet. Jane’s earrings helped me solve the problem of the braid. 

Bonds of Love” Bracelet / Rakhi
Single page pdf  ;  Longer version pdf 

The bracelet is tatted in 3 segments, joining as you go : The central medallion, and 2 heart medallions with braids on either side.
Diagrams follow the stitch colour of the tatted model, and I hope that makes it even more easy to follow along.

This single page diagram-only version was for the Tat Days goodie bag where Georgia added some lovely beads, buttons, findings, etc. Colour-coded diagram follows the stitch colour of the tatted model. 

This longer 4-page version was meant for some book/booklet that they release (I have no idea what it is, or the title, etc) and has a step-wise pictorial besides a written & diagrammed pattern.
Diagrams follow the stitch colour of the tatted model


The Design Process

A peek into the design/conversion process …. My objective was to keep the lines clean and pattern simple. It was the idea more than the execution, where one can choose any small medallions or motifs and join them together to create a bracelet, bookmark, insertion, etc.

Tacking on the beads to the old bracelet, with simple sewing thread & needle, to get a feel of what, how, … tried these 3 placements. Bead in the small rings of center would only make the rings floppy ; the one in 3rd pic looked too crowded! Settled on the last pic.
The single ring connection between the medallions was also weak and floppy and needed to be strengthened. Perhaps 2 rings would work.
Test-tatting
The 2-ring attachment worked fine and was doable.

First Version … Okay, everything worked, except for the ring in the very center. It appeared too small. At this stage, I had to string a couple of beads on the shuttle. Could I do it without Any bead on shuttle ?
TIP : Keep the long beaded picots just a tad longer than required for joining purposes, in order to maintain curvature. The beads need room to create the curve; if tightly snugged, it will become a straight line.

Second Version …Used a large pearl for the centre. Yes, it lifted up the whole ensemble, acting as a good focal point. This time, the center medallion was tatted first, and the 2 heart-braids joined on the go.  Worked much better !

Update Oct 20 : While posting, I noticed that there wasn’t a single pic with close-up of braids. Finally took one showing the braids in all 3 bracelets....
TIP for Braid : Do not close the SCMR too tightly – it will create a curvature on the way back. Leave it ‘straight’, with plenty of room to join back.

Both these versions will require some stiffening, since size 20 thread was used.

Third Version/Working …. I didn’t have any polyester thread or metallic thread (hadn’t organized my stash then ! Only later did I discover my metallic threads in silver, gold, and copper !!!), except for this pre-twisted green with metallic silver. This one stays nice and stiff.

TIP (above pic) : One way to load beads was with paper clips holding them in place. But these get in the way. So, when making the first long picot, load the number of beads required and hold with clip. Make 1 stitch and remove the clip and the beads and continue tatting. When it comes to the joining point, load the beads with a crochet hook, join and continue.
This accomplishes 2 things – one can determine the picot length for beads used, and it makes tatting smoother with no beads and clips hampering work.

Now that I have plenty of stashed metallic threads, my jewelry tatting will have some shimmer :-)
I like the fact that not a single bead needs to be pre-strung! And depending on the size of bead, one can adapt the length of the picot.
I didn’t have any clasps or toggles, hence left it with metal split rings.

Download pattern pdf : Bonds of Love diagram-only pattern

Many many thanks to Georgia, for giving me this wonderful opportunity !!!

«»«»«»«»«»«»«»«»«»«»«»«»«»«»«»«»«»


I have already shared the diagrams in the TWoT Rings Only pdf.
Here, I have added written pattern alongside the diagrams. This will go to my pattern page in the tab above.
Not to bore you further, but for a new reader ...the bouquet comprises 3 simple, rings-only patterns. These can be considered beginner patterns, I think.  
As seen in collaged pic above, Wiggly Flowers, Butterfly Liberated, and Laurel Leaf. constitute the 3 patterns that can be tatted separately or combined into a collage sewn to a fabric, or glued to a card. These are all small enough to empty shuttles and use as charms, clip ornaments, etc. etc. Check out Eliz’s adaptations of the flowers and butterfly here

Download pattern pdf Ring In The Bouquet

«»«»«»«»«»«»«»«»«»«»«»«»«»«»«»«»«»

Please Note : 
Rachael’s Hen n Chick Square Motif link did not work in the Set I pdf. Click on name for updated link. Link to video - https://www.youtube.com/watch?v=4SoGklhCqL0 
And when I checked further, the entire pdf can only be viewed, but am unable to download or open it in Window. This is the file that I edited using DocHub. I can't correct the link, hence have created a new revised link. This Way or Tat? Set I - Rings Only updated Oct 16


happy tatting always :-)

Friday 7 October 2016

a mixed bowl

Pin It now!
First things first…
I was going to post some of these along with the answers to my Set I questions. But This Way or Tat? (see all related posts at end for all links) has been lapped up by Georgia Seitz for her Online Tatting Class on Oct 10th (wait for the official announcement, though, just in case!) :-P  Thanks Georgia! Makes no sense in giving out answers at this stage. Plus, it struck me, why should I give answers ? It is the interested reader who should be sending in the answers if they wish, right ?! However, I will share some of the links later next week.
And now, ladling out …..

a mixed bowl of  tattiness :-P

Eliz Davis’ Ring Only Wreath – beads in the soup !

Decided to make the wreath  more Christmasy with beads for bling and ‘red cherries’ for a crunchy topping. Strung all these beads (and more) while thread was still on the ball, and then realized it was a short leftover thread :-( Restarted. 
Wound the beaded part on to shuttle but left thread attached to ball (the dark green on left side). It was a good decision coz I ran out of thread midways and could continue from the ball end, by stringing in more beads.
With beads adding some nice weight, it looked like a potential paazeb (broad anklets here) . (this video is of a Hindi movie song. It is a very decent song - don't get all excited by the first glimpse! I added this link because the song is all about the paazeb as a metaphor and as a bond between the 2 lovers. They are the Romeo-Juliet couple of Indian folklore). Of course, it would need a few ghungroos too!
Instead, wary of bead-stringing, I took the easier route – sewed in the two laurel leaves from previous post (mirror images).
Can be used as a necklace/choker with some stiffening & the right materials, and a chain added. Or as a frame around an oval daguerreotype.

My Butterfly Liberated - can't escape now, booked for a serving !
Wherefore did this daguerreotype emerge ?  The House of the Seven Gables – that’s where.
I’d read this long back, but picked it up again by mistake, and decided to read again. I love these leatherbound editions (although there are always some typos) with their attached satin ribbon bookmarks. However, the ribbon is short & tends to fray. It s also difficult to actually find the page coz there's no long ribbon end to hold on to. Here’s my instant solution (and expect many more such for all my other books in this publication)
My butterfly prototype with ribbon inserted & glued. Added just the right weight & stability, too.
TIP : My idea is also to try to string a few more butterflies & flowers along the entire length…..must rummage through my stash of old motifs !

Rachael Mohler’s Hen n Chick Square Motif – a mini coaster to set the bowl !
Intending it for a mini coaster, I used thick thread – a size 7 perhaps.
My first time trying out the Dora Young Knotless Method (DYK) on a Ring ! Loved it! Opens up more possibilities. UPDATE: video link - https://www.youtube.com/watch?v=4SoGklhCqL0
Unsure how the DYK rings would turn out, I had started with leftover threads. Hence the numerous tails.
TIP : Adding new thread to a bare thread pattern : Leave about 4-5" tail of previous ring. Start new ring with new thread by grabbing the old tail within the new thread loop, and tatting over the new tail for few stitches. This takes care of one tail. Later, sew in the old tail in this new ring. No Knots !!!

And I misspelled Rachael's name in the Set I pdf . So I took the plunge into Doc Hubs and figured out how to edit it, YAY! New downloads will have the correction, but those who have already printed it out, please make the correction.
It was also my very first Hens n Chicks working.

But my MIL had made several handkerchief edgings using this pattern back in the 90s for gifting, etc.. Sorry about the blur - the original pics were small.


Together we fly butterfly – it’s all in the mix !
A small butterfly project on Craftree. Unknown designer, stitch count & prototype by Claudia & diagram by me. Many others have shown interest in test-tatting. That’s why I called mine ‘Together We Fly”. The diagram is not finalized – waiting for more feedback. This is my working. All in one pass. Can easily be made in 2 colours, using single shuttle and ball. Will share more details eventually. It’s such a pretty butterfly.


tattingweed’s Crinoline Doily – keep stirring in all directions !
This gorgeous doily pattern by the talented Korean, Hamigyeong, was added to the Craftree database yesterday. And the moment I saw the pattern, I just Had to give it a go. See all the directional changes it incorporates ? Wow ! Started in size 40, aiming for a glass window effect . This has given me so much more thought for the TWoT series. Will share working details later; this is just a quick peek ….

I enjoyed this multi-project bowl tremendously ! Hope you enjoyed my serving :-)


happy tatting always :-)

Related Links :
This Way or Tat? (TWoT) Series - Preface (Quo vadis) ; Introduction ; Set I - Rings Only
Eliz's left v/s right hand tatting effect on direction