Thursday 31 May 2018

I love floating

Pin It now!
The task was split chains and floating chains. I chose floating chains - 
also known as dead end chain, curlicue, or single shuttle split chain (SSSCh).

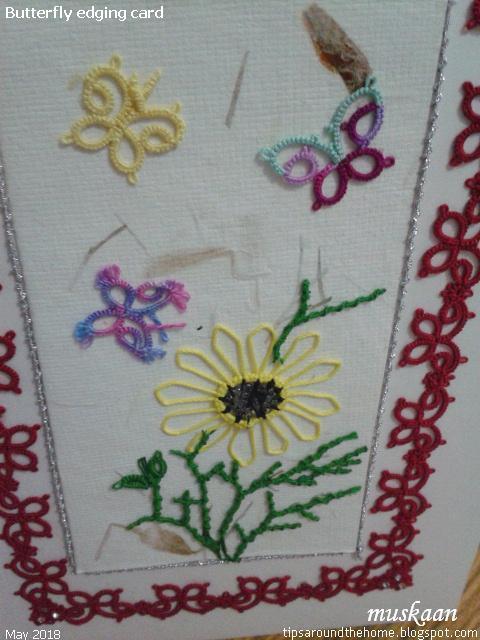
This black butterfly with curlicue antennae and the 3 with venetian picots (a variation of floating chains) was my earlier submission for the task. However I have a feeling that it was not appreciated by the ladies there. In any case I needed to complete the card topper.

I had gifted the earlier card to my SIL. MIL liked it very much, so this butterfly edging card is for her. For the card topper I used handmade paper with herbs embedded in it. I glued some folded paper underneath to raise the level slightly.

 
Rummaging through my many little scrap pieces, I tried to choose and arrange them into some collage (taking many pics to remember the arrangements) but finally settled on a fairly simple arrangement. I absolutely loved how Jane's Maltese Sunflower looked here, so that stayed obviously. And these were the only 3 butterflies that seemed proportionate.

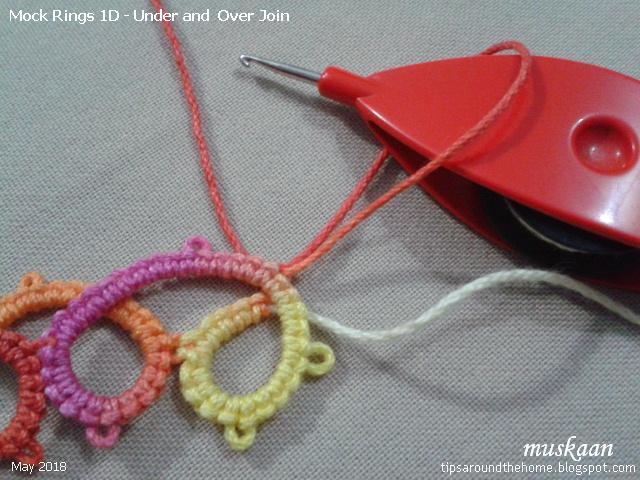
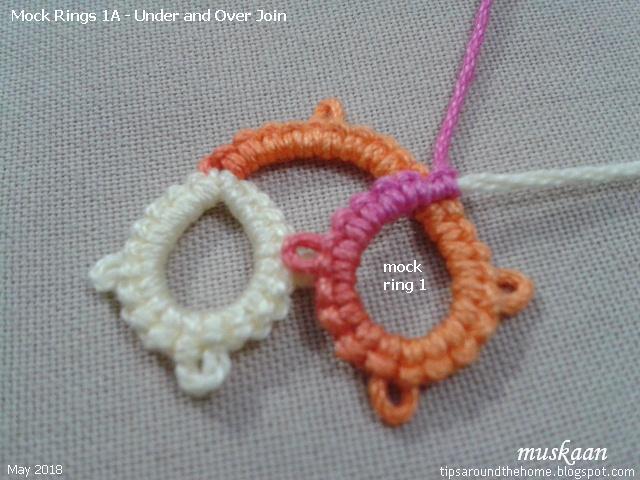
Time to work on the foliage.... A helper thread worked wonders to wrap around the hand and hold the core thread taut while encapsulating. 
I mentioned this in my tutorial especially for fine thread, but didn't show it on the fingers.

All chains are spiral or Josephine chains. I like the texture and dimension they create without taking up too much space. In Anchor size 40, they are about 4cms tall maximum. 

While working on the foliage my Lizbeth specialty packs (size 20) arrived and I made one more butterfly using floating chain tipped with a Josephine ring for each antenna. 
Unfortunately it was too large for this scenery at 2-2/5×2 cms (2½cms high with antennae). 

 
The tatting SOUP has been arranged then glued! 
I deliberately followed the slant of the herbs in the handmade paper - it is what inspired this nature collage. But it still needs some balance and sparkle.

3 Swarovski crystals glued inside corner florets. 
Unfortunately, my stash was lacking in anything smaller for the rest of the florets. 

Added another little foliage on top of flower. 
And to echo the crystals, I tatted and glued a Josephine chain cord using metallic embroidery thread all around the topper. 
The core is size 40 crochet cotton for easier handling.

TIP: When making long JChs, I like to wind the chain thread on a shuttle too. 
It is convenient to dangle the shuttles and maintain the twist within both threads.


There seems to be something missing along the outermost edge or periphery - too plain. 
Any ideas to bring it all together? Another silver chain all around? 
Or 3 crystals in each corner? A mirror in each corner?

Check out what the others have made here.
With the exception of the sunflower, the entire card topper collage is worked with one shuttle and ball. A 2nd shuttle was used only in case of 2nd colour or for convenience. There is no dearth of techniques and effects that can be created with a shuttle - including the many variations of SSSCh or floating chain!

under appropriate headings. 

hope you have a great day with lots of creative tatting floating in ! 

Tuesday 29 May 2018

Mock Rings 1 U-O Join continued

Pin It now!
In my haste to upload, I missed adding some details to the pics in previous post. These have now been notated and updated.

Continuing from previous post ….


The following are again mock rings made using the Under and Over Join. But we now have a tiny picot at the start of the chain. When the chain is joined back to this picot, it creates a mock or false ring.


1C. Under and Over Join: With joining picot; Unattached rings

 
 Make a small picot at the base of the chain before tatting the ‘ring’ portion.
Since the mock ring is unattached, it is easy to place 
one thread above and other below the chain.

 
Pull up a loop of ball thread through the picot, pass shuttle, and snug. 
A simple picot join converts this chain into a mock ring. Continue tatting.
Note: Although we have made a picot join, this arrangement of joining an overlapping chain is included in under-over join. 

 
This time the shuttle thread is below and ball thread above.
Pull a loop of ball thread down through the picot, pass shuttle and tension the join.
Two unattached mock rings made with under-over join 

1D. Under and Over Join: With joining picot; Attached rings

 
Here the ‘ring’-chain is linked to previous ring and both threads are above the chain.
Pull ball loop down through picot, pass shuttle and make the join.
This is reminiscent of the down join.
 Continue tatting.

 
For mock ring #8 both threads are below the chain. 
Pull up a loop of ball thread through picot, pass shuttle and snug the join.
Notice the change in overlap between mr7 & mr8! Continue tatting.


as seen from the back.
This above sampler, with joining picots and overlapping chains that form loops is also known as the Running Scroll, for it’s flowing cursive style.


This join can also be used to create a line of back to back rings – called a Cord of Loops. We now prefer to work this as a split ring braid or mock rings with a flatter closure. The latter will be discussed in future posts.

Observations
  1. In all these mock ring instances, the core thread remains free to slide.
  2. They can all be worked with a ball and shuttle.
  3. All mock rings face the same side as the normal first and last rings when we reverse work after first ring.
  4. The under and over join creates a slight overlap/layer when crossing over, giving the mock ring a dimensional effect rather than lying absolutely flat.
  5. The overlap changes depending on which type of crossover we choose.

This completes the first category of mock/false rings using a join across a chain.
But there are so many more ways of joining or closing a chain to create a faux ring. While I work on that presentation, I invite you to sit back and recall all the different ways in which you may have made mock rings. It is quite an eye-opener. Please share your list in the comment box in case I have missed some.


Main references:
Tatting Technique & History – Elgiva Nicholls, 1962. (running scroll & cord of loops explanation  on p94, models on p96)
An Illustrated Dictionary of Tatting – Judith Connors, 2007.

…. to be continued 
See also -
https://tipsaroundthehome.blogspot.com/2018/05/mock-rings-1-under-and-over-join.html
https://tipsaroundthehome.blogspot.com/2018/06/mock-rings-2-lock-join.html
https://tipsaroundthehome.blogspot.com/2018/06/mock-rings-2-lj-mock-onion-rings.html

Monday 28 May 2018

Mock Rings 1 Under and Over Join

Pin It now!
SCMR is a mock ring, but not every mock ring is a SCMR (self-closing mock ring).
While trying to explain this to someone who used SCMR as a default term, I started to remember so many different ways a mock ring can be shaped.

Mock Rings have been around for centuries. A mock ring is essentially a chain that is joined back on itself to create the impression of a ring. The difference lies only in the way the chain is closed.
In order to avoid overload I will break up the presentation into segments. This post covers mock rings made using the Under and Over Join.

Mock Rings 1: Under and Over Join


Once the tatted chain was invented, it was a simple step to convert it into a mock ring using an Under and Over Join - with or without a picot. Under and Over Join is a type of ‘across’ join, allowing us to move threads to the other side across an existing element.

A single shuttle filled with cream thread and a ball with variegated colour are used for clear distinction in this pictorial.
There are 5 stitches between every picot; each ring is 5-5-5-5 & chain 5-5.

1-A. Under and Over Join: Without joining picot; Unattached rings

After a normal ring (cream), RW and 5-5 chain (above pic), we start working on a long chain (5-5-5-5) that will form the mock ring. 
 

Place shuttle thread above and ball thread under the chain. Continue tatting the chain normally, enduring that the first half stitch after the crossover is nicely snug.
A mock ring is made, with the chain (running scroll) moving across from above.

Note: Because of RW, the mock rings face the same side as the first normal ring.
We know this popularly as Alligator or Capture Join.


Let’s see what happens if we switch thread positions (ball above and shuttle under). 
It is difficult to control the shuttle enough to get a continuous chain above. 
But it can be useful in directional (fs/bs) tatting when working from the back side.

This method is useful when the elements (in this case mock rings) are free/unlinked and the threads can be positioned on either side.
But if the ring is attached to previous element, here’s how the join can be made.


1-B. Under and Over Join: Without joining picot; Attached rings

After linking the chain to previous ring, both threads are in front of/above the chain.
Pull a loop of ball thread down from under the chain, pass shuttle through loop, and snug tightly. Continue tatting chain.

In this case, after linking the chain, both threads are below/under the chain.
Pull a loop of ball thread up, pass shuttle through it, and snug tightly. Continue tatting chain.

This pulled loop is very handy when crossing over any previous element as in faux Celtic tatting. I used it in Teri Dusenbury’s Flurry snowflake. The pattern instructed slipping the long ball thread through the spaces and tatting the chain (as in #1A or alligator join). It was cumbersome and prone to tangling. Pulling a loop through the joining point is a quicker, more efficient method.
I made this in 2015, but am unhappy with my work.

This is a view from the back.

Without a joining picot at the start, there is greater flexibility in shaping the mock ring, but one also has to be extra careful to see that the ‘join’ is snug and secure. Adding a small picot at the start of the chain ensures accuracy and stability. I will show this in next post, along with some observations.


…. to be continued
Till then, enjoy tatting all over :-)))
See also -
https://tipsaroundthehome.blogspot.com/2018/05/mock-rings-1-u-o-join-continued.html
https://tipsaroundthehome.blogspot.com/2018/06/mock-rings-2-lock-join.html
https://tipsaroundthehome.blogspot.com/2018/06/mock-rings-2-lj-mock-onion-rings.html

Thursday 24 May 2018

add new thread to bare thread pattern

Pin It now!
While using the SCMR to add new thread Within a ring, I wondered whether we could also use it in a bare thread or single shuttle pattern. Turns out we can, though it involves a bit of a twist in the tail.

Adding new thread to bare thread pattern 
with self-closing mock ring (SCMR)


I have already described one method of adding new thread, finishing off with a SSSR (link below). This new method is yet another option – very secure; no doubling of bare threads; easy to add new colours frequently; knotless. And it can be sew-free with MTT.

1. Let’s say I’m running low on thread after these 3 rings (each is 5-5-5-5). But I still have enough to make the stitches but not enough for the core thread.

2. Load another shuttle and add fold in the new thread (I used coloured thread for clarity), bringing the tail through as shown.

3. Then leave a loop of new core thread and start working stitches with old thread like a chain. This is the start of the SCMR. Tat over new tail for a few stitches.
(see Variation below)
TIP : In case the old thread is too short to wrap around pinky, tie a scrap/helper thread at the very tip with a weaver’s knot.

4. The ‘ring’ is complete.

5. Pass shuttle through the loop to close the SCMR.

6. Now pull the new TAIL up to close the ring. Notice the pink tail has become longer.

7. Both tails are visible – new thread and old thread.

8. Insert new tail through a tapestry needle and whip stitch back towards the base of the ring. This will ensure the stability and durability of the lace.
I guess one can use the Magic Thread Trick for sew-free hiding but I like to whip stitch the tails.

9.  Next sew in the old tail, moving up the ring on the right side.

10. Pull both tails to remove any slack. Then snip off the excess length in each. 
New thread added with bare thread between the rings!
Pull and tug but the tails/rings will not unravel.


Variation

A. A variation is to tie a knot with old thread encapsulated within it, leaving bare thread space before tightening the knot.
B. Leave a loop of the new core thread and start working the SCMR. Tat over the new tail, hiding it within the first few stitches.
Close the SCMR as usual buy assing shuttle through loop and pulling the core thread taut. With the new tail already hidden, we only need to whip stitch/hide the old tail on the right side of ring.
Heather (see link below) tats over both tails thus avoiding any sewing. I prefer hiding tails in different elements/stitches to avoid bulk.

I’m not sure how much this method will help because there are already so many to choose from. However, I did not find this SCMR method/variation and having already taken pictures, I decided to go ahead and share.


For quick reference, here are links to some of the other methods to add new thread to single shuttle/bare thread/rings-only patterns (random listing):


 happy tatting always J